
 |

|
Primitive Attributes |
Tutorials > OpenGL > Primitive Attributes
| View Full Source |
Introduction
 In the previous tutorial, you learnt how to render various primitives to an OpenGL window. In this tutorial,
you will learn how to alter the rendering behaviour of primitives by specifying various primitive attributes.
In the previous tutorial, you learnt how to render various primitives to an OpenGL window. In this tutorial,
you will learn how to alter the rendering behaviour of primitives by specifying various primitive attributes.
The base of this tutorial has been taken from the previous tutorial.
Contents of main.cpp :
Line Stipple Definitions
The first primitive modifications we will talk about are line stipples. Line stipples are used to create gaps in lines. You can use this to create dashed lines, dotted lines and many other variations.
A stipple pattern is represented as a hexidecimal number ie. 0x???? where a ? can be a digit from 0 to 9 or a letter from A (10) to F (15). If you convert this hexidecimal number into its binary equivalents, you will be able to determine the stipple pattern.
e.g. 0x1234
1 = 0001
2 = 0010
3 = 0011
4 = 0100
therefore 0x1234 = 0001 0010 0011 0100
If you now read the above binary number from right to left, you can work out the stipple pattern. The above pattern means that the first 2 pixels of the line will be off, the next will be on, the next will be off, the next 2 will be on, etc.
To test this fully, we create 5 different stipple patterns.
int lineStipples[] =
{
	//1010 1010 1010 1010 = 10 10 10 10
	0xAAAA,
	//0000 1111 0000 1111 =  0 15  0 15
	0x0F0F,
	//1111 1111 1111 0000 = 15 15 15  0
	0xFFF0,
	//0000 0000 0000 1111 =  0  0  0 15
	0x000F,
	//0001 0001 0001 0001 =  1  1  1  1
	0x1111
};
Now that we have created some stipple patterns, it is time to move onto the display function.
void display()
{
	glClear(GL_COLOR_BUFFER_BIT);
Point Size
The first attribute we will be modifying is the size of the point primitive. The current size of the point can be retrieved by passing GL_POINT_SIZE to the glGetFloatv function. We will discuss other uses of the glGet functions when the need arises.
	// Point Size
	float pointSize = 0;
	glGetFloatv(GL_POINT_SIZE, &pointSize);
To actually modify the size of the OpenGL point primitive, you can pass a float value to the glPointSize function. This value specifies the diameter of the point. The default value is 1.0.
The code below will simply render 5 points with each one larger than the previous.
	for (int i = 0; i < 5; i++)
	{
		glPointSize((float)(i + 1));

		glBegin(GL_POINTS);
			glVertex3f(-0.4f + i / 5.0f, 0.8f, 0.0f);
		glEnd();
	}
The point size is then restored to its previous value.
glPointSize(pointSize);
Line Width
The next attribute we will modify is the width of the line primitive.
The current line width can be determined in the same way as the point size was, except that GL_LINE_WIDTH is passed onto the glGetFloatv function.
	// Line Width
	float lineWidth = 0;
	glGetFloatv(GL_LINE_WIDTH, &lineWidth);
In the same way that the 5 points were, 5 lines are rendered, each increasing in size. The width (float) is passed to the glLineWidth function. The default value is 1.0.
	for (int i = 0; i < 5; i++)
	{
		glLineWidth((float)(i + 1));

		glBegin(GL_LINES);
			glVertex3f(-0.6f, 0.7f - i * 0.1f, 0.0f);
			glVertex3f( 0.6f, 0.7f - i * 0.1f, 0.0f);
		glEnd();
	}
The original line width is then restored.
glLineWidth(lineWidth);
Polygon Modes
Another useful feature of OpenGL is the ability to change how polygons are rendered to the screen. Polygons can either be rendered as points (vertices), lines (wireframe) or filled.
To determine the current polygon mode, you need to make a call to glGetIntegerv with the first parameter being GL_POLYGON_MODE and the second being a 2-dimensional integer array.
	// Polygon Mode
	int polygonMode[2];
	glGetIntegerv(GL_POLYGON_MODE, polygonMode);
The first integer in the array specifies the polygon mode for front-facing polygons while the second integer specifies the polygon mode for back-facing polygons.
The glPolygonMode function is used to change the current polygon mode. The function takes 2 parameters.
The first specifies which faces will be affected by this change. The possible values are GL_FRONT, GL_BACK or GL_FRONT_AND_BACK which refer to front-facing polygons, back-facing polygons or both.
The second parameter specifies the mode to be used. This can be either GL_POINT, GL_LINE or GL_FILL. These are the modes that were discussed at the beginning of this section.
The next segment of code draws 3 triangles, each using a different rendering mode. From left to right, the triangles are rendered using filled polygons, lines and points.
	glPolygonMode(GL_FRONT_AND_BACK, GL_FILL);
	glBegin(GL_TRIANGLES);
		glVertex3f(-0.8f, 0.0f, 0.0f);
		glVertex3f(-0.6f, 0.0f, 0.0f);
		glVertex3f(-0.7f, 0.2f, 0.0f);
	glEnd();

	glPolygonMode(GL_FRONT_AND_BACK, GL_LINE);
	glBegin(GL_TRIANGLES);
		glVertex3f( 0.1f, 0.0f, 0.0f);
		glVertex3f(-0.1f, 0.0f, 0.0f);
		glVertex3f( 0.0f, 0.2f, 0.0f);
	glEnd();

	glPolygonMode(GL_FRONT_AND_BACK, GL_POINT);
	glBegin(GL_TRIANGLES);
		glVertex3f( 0.6f, 0.0f, 0.0f);
		glVertex3f( 0.8f, 0.0f, 0.0f);
		glVertex3f( 0.7f, 0.2f, 0.0f);
	glEnd();
We now restore the initial values previously stored.
	glPolygonMode(GL_FRONT, polygonMode[0]);
	glPolygonMode(GL_BACK, polygonMode[1]);
Line Stipples
The next few code segments will show how the line stipples we have declared can be used.
The first step when using line stipples is to pass GL_LINE_STIPPLE to the glEnable function. This simply enables line stipple patterns.
	// Line Stipple
	glEnable(GL_LINE_STIPPLE);
To specify a stipple pattern, you need to make use of the glLineStipple function. The parameters are described below.
GLint factor - This is used as a multiplier for the stipple pattern. If this value is 5 for example, each bit in the pattern will be repeated before moving onto the next bit. This value is clamped to [1,256] with the default value being 1.
GLushort pattern - This refers to the stipple pattern. We simply pass in one of the stipple patterns we defined at the beginning of the program.
The code below renders 10 lines. Each stipple pattern is used twice, once with a multiplier of 1 and once with a multiplier of 3.
	for (int i = 0; i < 5; i++)
	{
		glLineStipple(1, lineStipples[i]);
		glBegin(GL_LINES);
			glVertex3f(-0.6f, -0.1f - i * 0.1f, 0.0f);
			glVertex3f(-0.1f, -0.1f - i * 0.1f, 0.0f);
		glEnd();

		glLineStipple(3, lineStipples[i]);
		glBegin(GL_LINES);
			glVertex3f( 0.6f, -0.1f - i * 0.1f, 0.0f);
			glVertex3f( 0.1f, -0.1f - i * 0.1f, 0.0f);
		glEnd();
	}
Once we have finished with line stippling, we can simply pass GL_LINE_STIPPLE to the glDisable function.
glDisable(GL_LINE_STIPPLE);
Edge Flags
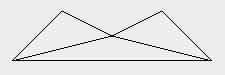
When rendering polygons using lines, you may not want the interior lines displayed. These lines can be removed with the use of edge flags.
	// Edge Flags
	glPolygonMode(GL_FRONT_AND_BACK, GL_LINE);
	glBegin(GL_TRIANGLES);
You specify an edge flag by passing GL_TRUE to the glEdgeFlag function. Any pair of vertices specified will now result in a line. If you pass GL_FALSE onto this function, no lines will be rendered. This is used when you are specifying two vertices that would result in a line moving through the object.
The code below creates an object without any lines running through the object.
		glEdgeFlag(GL_TRUE);
		glVertex3f(-0.2f, -0.6f, 0.0f);
		glEdgeFlag(GL_FALSE);
		glVertex3f(-0.4f, -0.8f, 0.0f);
		glEdgeFlag(GL_TRUE);
		glVertex3f( 0.0f, -0.7f, 0.0f);

		glEdgeFlag(GL_FALSE);
		glVertex3f(-0.4f, -0.8f, 0.0f);
		glVertex3f( 0.0f, -0.7f, 0.0f);
		glEdgeFlag(GL_TRUE);
		glVertex3f( 0.4f, -0.8f, 0.0f);

		glEdgeFlag(GL_FALSE);
		glVertex3f( 0.0f, -0.7f, 0.0f);
		glEdgeFlag(GL_TRUE);
		glVertex3f( 0.4f, -0.8f, 0.0f);
		glVertex3f( 0.2f, -0.6f, 0.0f);
	glEnd();
	glPolygonMode(GL_FRONT_AND_BACK, GL_FILL);

	glFlush();
}
The result with and without the use of edge flags can be seen below.
 |
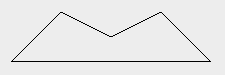 |
| Edges Included | Edges Removed |
Congratulations. You should now have a good idea on how you can modify a few of the basic OpenGL primitives by specifying additional rendering attributes.
Please let me know of any comments you may have : Contact Me
| Win32 Source Files : |  |
 |
||
| GLUT Source Files : | |
|
 |
Last Updated : 14 October 2005
| < Tutorial 05 - Primitives | Tutorial 07 - Orthographic Projection > |
All Rights Reserved, © Zeus Communication, Multimedia & Development 2004-2005
Read the Disclaimer
 |
|
|
|
What tutorial would you like to see next? |
|
Useful Books : 
|
Link to ZeusCMD

|