
 |

|
Primitives |
Tutorials > OpenGL > Primitives
| View Full Source |
Introduction
 In this tutorial, you will finally get to draw something. Everything that is displayed
in OpenGL is made up of a number of primitives. These
primitives are simple points, lines, shapes, polygons, etc.
In this tutorial, you will finally get to draw something. Everything that is displayed
in OpenGL is made up of a number of primitives. These
primitives are simple points, lines, shapes, polygons, etc.
The tutorial will follow on from the previous tutorial.
Contents of main.cpp :
Our init function remains the same but notice that an additional call to the glColor3f function has been made. This will be discussed in a future tutorial when we discuss color but for now, it is simply to draw everything in black so that it can be seen on the new gray (0.93, 0.93, 0.93) background we will be using.
bool init()
{
	glClearColor(0.93f, 0.93f, 0.93f, 0.0f);
	glColor3f(0.0f, 0.0f, 0.0f);

	return true;
}
One method of creating primitives is to make a call to glBegin. This function accepts one parameter indicating what primitives are going to be created.
Each primitive is made up vertices. These vertices are created with calls to the glVertex functions. A number of OpenGL functions follow the same format as the glVertex functions. All functions have the form glVertexNX where N specifies the number of parameters in the function and X specifies the data type used for the parameters eg. glVertex2i accepts 2 integers and glVertex4s accepts 4 shorts. An additional v can be placed on the end indicating that an array of the specified type is to be passed eg. glVertex2fv accepts an array of 2 floats.
In this tutorial, we will be using the glVertex3f function, therefore accepting 3 floats. These 3 parameters specify the x, y and z coordinates. As all of our z coordinates are 0, we could easily have used the glVertex2f function.
When all vertices have been specified, the end of the primitive drawing needs to be specified with a call to glEnd. This function does not take any parameters.
Before displaying any code, a description of each primitive is given below :
| Flag | Description | Preview |
| GL_POINTS | Each vertex specifies a point. |

|
| GL_LINES | Each pair of vertices creates a line. |

|
| GL_LINE_STRIP | The first vertex specifies a starting point and every successive vertex creates a line from the previous vertex. |

|
| GL_LINE_LOOP | This is the same as the GL_LINE_STRIP except that the first and last vertices are also connected with a line. |

|
| GL_TRIANGLES | Each triplet of vertices forms a triangle. |

|
| GL_TRIANGLE_STRIP | This first 3 vertices form a triangle. Every following vertex along with the previous 2 vertices is used to form another triangle. |

|
| GL_TRIANGLE_FAN | This first vertex specifies your main vertex. Every following pair of vertices are used along with the main vertex to form a triangle. |

|
| GL_QUADS | Every 4 vertices form a quadrilateral. |

|
| GL_QUAD_STRIP | The first 4 vertices form a quadrilateral. Every successive pair of vertices combine with the previous pair to form another quadrilateral. |

|
| GL_POLYGON | N vertices can be placed to create an N sides polygon. |

|
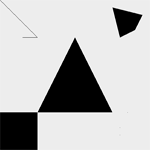
Now that you are more familiar with the primitives that are available to us, we will begin rendering some of them. The first step in our display function is to clear the color buffer.
void display()
{
The first primitives we will draw are some points. The default OpenGL window runs from -1 to 1 left-to-right and bottom-to-top. The points will therefore be drawn at the bottom-right of the window.
	glClear(GL_COLOR_BUFFER_BIT);

	glBegin(GL_POINTS);
		glVertex3f( 0.7f, -0.5f, 0.0f);
		glVertex3f( 0.6f, -0.7f, 0.0f);
		glVertex3f( 0.6f, -0.8f, 0.0f);
	glEnd();
The next primitive we will draw is a simple line strip. The code below will simply draw 2 lines connected to each other in the top-right corner.
	glBegin(GL_LINE_STRIP);
		glVertex3f(-1.0f,  1.0f, 0.0f);
		glVertex3f(-0.5f,  0.5f, 0.0f);
		glVertex3f(-0.7f,  0.5f, 0.0f);
	glEnd();
A large triangle will now be drawn in the center of the window. Note that we could place another 3 vertices between these glBegin and glEnd functions to create another disconnected triangle.
	glBegin(GL_TRIANGLES);
		glVertex3f(-0.5f, -0.5f, 0.0f);
		glVertex3f( 0.5f, -0.5f, 0.0f);
		glVertex3f( 0.0f,  0.5f, 0.0f);
	glEnd();
Our second last primitive we will draw is a square situated in the bottom-left of the screen. We will use the quad primitive to achieve this.
	glBegin(GL_QUADS);
		glVertex3f(-1.0f, -1.0f, 0.0f);
		glVertex3f(-0.5f, -1.0f, 0.0f);
		glVertex3f(-0.5f, -0.5f, 0.0f);
		glVertex3f(-1.0f, -0.5f, 0.0f);
	glEnd();
Our final primitive is the polygon. The code below draws a 4-sided polygon at the top-right of the screen.
	glBegin(GL_POLYGON);
		glVertex3f( 0.8f,  0.6f, 0.0f);
		glVertex3f( 0.9f,  0.8f, 0.0f);
		glVertex3f( 0.5f,  0.9f, 0.0f);
		glVertex3f( 0.6f,  0.5f, 0.0f);
	glEnd();

	glFlush();
}
Well done. You should now be able to render simple primitives to the window. Try playing around with drawing different primitives to the screen. Also try using some primitives that were not in our display code above.
Please let me know of any comments you may have : Contact Me
| Win32 Source Files : |  |
 |
||
| GLUT Source Files : | |
|
 |
Last Updated : 14 October 2005
| < Tutorial 04 - Rendering | Tutorial 06 - Primitive Attributes > |
All Rights Reserved, © Zeus Communication, Multimedia & Development 2004-2005
Read the Disclaimer
 |
|
|
|
What tutorial would you like to see next? |
|
Useful Books : 
|
Link to ZeusCMD

|