
 |

|
Perspective |
Tutorials > OpenGL > Perspective
| View Full Source |
Introduction
 In the real world, if you have many objects of the same size at different distances from
you, you will notice that the further away the objects are, the smaller they appear.
In the real world, if you have many objects of the same size at different distances from
you, you will notice that the further away the objects are, the smaller they appear.
In the previous tutorial, you would have noticed that the triangles that were placed further back were actually the same size as the first triangle in the front.
This tutorial will explain how a perspective view can be created to cause objects further away to appear smaller. Please remember to review the 2nd tutorial on setting up the GLU library if you are using Dev-C++.
Contents of main.cpp :
A variable is kept to indicate whether we are looking at an orthographic or perspective view. This allows us to change between the two to see the difference.
bool perspective = true;
To show how perspective works, we will be rendering 3 polygons to the screen, each with a different z value. The drawQuad function has been created to simply draw one polygon.
void drawQuad()
{
	glBegin(GL_QUADS);
		glVertex2f(-0.25f, -0.25f);
		glVertex2f( 0.25f, -0.25f);
		glVertex2f( 0.25f,  0.25f);
		glVertex2f(-0.25f,  0.25f);
	glEnd();
}
The beginning of the display function remains the same.
void display()
{
	glClear(GL_COLOR_BUFFER_BIT | GL_DEPTH_BUFFER_BIT);
	glLoadIdentity();
If you are wanting to move the position of the camera (your view), you could modify the projection matrix. This can get quite complicated so to make your life easier, you can use the gluLookAt function which is included in the GL/glu.h header file.
This function takes 9 parameters which make up 3 coordinates or vectors. The first coordinate specifies where you would like the camera to be placed within your world. The second coordinate specifies the point that you would like the camera to be pointing to. The last coordinate specifies the normalized up vector. You will usually use (0,1,0) for this vector.
The code below places the camera 2 units away from the origin (0, 0, 0) and looks towards the origin.
	gluLookAt(
		0.0f, 0.0f, 2.0f,
		0.0f, 0.0f, 0.0f,
		0.0f, 1.0f, 0.0f);
The next segment of code draws 3 polygons, each one appearing behind and to the left of the previous one.
	glColor4f(1.0f, 0.0f, 0.0f, 1.0f);
	glTranslatef(0.25f, 0.0f, 0.0f);
	drawQuad();

	glColor4f(0.0f, 1.0f, 0.0f, 1.0f);
	glTranslatef(-0.25f, 0.0f, -1.0f);
	drawQuad();

	glColor4f(0.0f, 0.0f, 1.0f, 1.0f);
	glTranslatef(-0.25f, 0.0f, -1.0f);
	drawQuad();

	glFlush();
}
The beginning of our resize function stays the same.
void resize(int w, int h)
{
	glMatrixMode(GL_PROJECTION);
	glLoadIdentity();

	glViewport(0, 0, w, h);
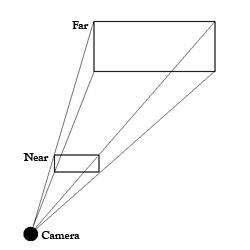
Like using glOrthof to create an orthographic view, glFrustumf can be used to create a perspective view. The parameters are the same as the glOrthof function ie. left, right, bottom, top, near, far coordinates of the clipping plane.
This creates a view similar to the image below. The larger the plane, the smaller the object will appear. Objects further away will therefore appear smaller.
As you can see, this function is not very intuitive. Another function, gluPerspective, has been created to overcome this. The parameters for this function follow below :
GLdouble fovy - This specifies the field of view. A 90 degree angle means that you can see everything directly to the left right around to the right of you. This is not how humans see things. I have passed a value of 45 degrees which is a more accurate value.
GLdouble aspect - This specifies the aspect ratio that you desire i.e. what is the ratio of the width and the height. This is specified as the width divided by the height of the window.
GLdouble n & GLdouble f - This specifies the near and far clipping planes as normal.
The code below sets up a perspective view or an orthographic view depending on the perspective boolean variable.
	if (perspective)
		gluPerspective(45.0f, 1.0f * w / h, 1.0f, 100.0f);
	else
		glOrtho(-1.0f, 1.0f, -1.0f, 1.0f, -1.0f, 20.0f);

	glMatrixMode(GL_MODELVIEW);
	glLoadIdentity();
}
The idle function allows the user to press the P key to toggle perspective mode on and off. Note that we call the resize function again to update the current view.
void idle()
{
	if (opengl->isKeyDown('P'))
	{
		opengl->keyUp('P');

		perspective = !perspective;

		resize(opengl->getWidth(), opengl->getHeight());
	}
}
Well done. You should now be able to set up a perspective view, allowing you to add proper depth to your OpenGL scenes. When running the program, you can press the P key to change between perspective and orthographic view. The result is shown below.
 |
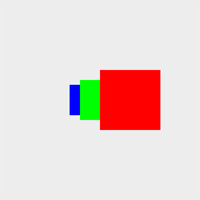 |
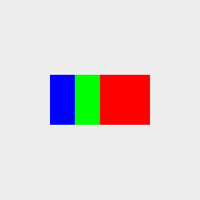
| Orthographic | Perspective |
Please let me know of any comments you may have : Contact Me
| Win32 Source Files : |  |
 |
||
| GLUT Source Files : | |
|
 |
Last Updated : 5 December 2005
| < Tutorial 11 - Depth | Tutorial 13 - Solid Shapes > |
All Rights Reserved, © Zeus Communication, Multimedia & Development 2004-2005
Read the Disclaimer
 |
|
|
|
What tutorial would you like to see next? |
|
Useful Books : 
|
Link to ZeusCMD

|