 |

|
Solid Shapes |
Tutorials > OpenGL > Solid Shapes
| View Full Source |
Introduction
 Now that we have the ability to process depth and we can display primitives in a
perspective view, we are able to create 3D objects.
This tutorial follows on from the previous tutorial. A perspective view and depth parameters have already been setup. We will also cover how to allow the user to rotate the object on the screen with the mouse, a technique which will be used for most future tutorials.
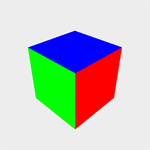
The 3D object produced in this tutorial is the famous cube.
Contents of main.cpp :
To rotate the cube, we need to create some cubes to hold the current angle of rotation. This is needed for both the x and y axes.
float xrot = 0.0f;
float yrot = 0.0f;
The two variables defined below are used to store the change in mouse position. This is used to allow the user to rotate the cube at their own free will. You will see more clearly further in this tutorial how they are used.
float xdiff = 0.0f;
float ydiff = 0.0f;
The easiest way to represent the cube is to use 6 quads. The code below renders a 1 x 1 x 1 unit cube. Opposite sides of the cube are rendered with the same color. Take note that the vertices of the cube are specified in an anti-clockwise order. You will see why this is important in the next tutorial.
void drawBox()
{
	glBegin(GL_QUADS);

		glColor3f(1.0f, 0.0f, 0.0f);
		// FRONT
		glVertex3f(-0.5f, -0.5f,  0.5f);
		glVertex3f( 0.5f, -0.5f,  0.5f);
		glVertex3f( 0.5f,  0.5f,  0.5f);
		glVertex3f(-0.5f,  0.5f,  0.5f);
		// BACK
		glVertex3f(-0.5f, -0.5f, -0.5f);
		glVertex3f(-0.5f,  0.5f, -0.5f);
		glVertex3f( 0.5f,  0.5f, -0.5f);
		glVertex3f( 0.5f, -0.5f, -0.5f);

		glColor3f(0.0f, 1.0f, 0.0f);
		// LEFT
		glVertex3f(-0.5f, -0.5f,  0.5f);
		glVertex3f(-0.5f,  0.5f,  0.5f);
		glVertex3f(-0.5f,  0.5f, -0.5f);
		glVertex3f(-0.5f, -0.5f, -0.5f);
		// RIGHT
		glVertex3f( 0.5f, -0.5f, -0.5f);
		glVertex3f( 0.5f,  0.5f, -0.5f);
		glVertex3f( 0.5f,  0.5f,  0.5f);
		glVertex3f( 0.5f, -0.5f,  0.5f);

		glColor3f(0.0f, 0.0f, 1.0f);
		// TOP
		glVertex3f(-0.5f,  0.5f,  0.5f);
		glVertex3f( 0.5f,  0.5f,  0.5f);
		glVertex3f( 0.5f,  0.5f, -0.5f);
		glVertex3f(-0.5f,  0.5f, -0.5f);
		// BOTTOM
		glVertex3f(-0.5f, -0.5f,  0.5f);
		glVertex3f(-0.5f, -0.5f, -0.5f);
		glVertex3f( 0.5f, -0.5f, -0.5f);
		glVertex3f( 0.5f, -0.5f,  0.5f);
	glEnd();
}
Our display function is very simple. It simply places the camera 3 units down the z axis, applies two rotation transformations and renders the cube.
void display()
{
	glClear(GL_COLOR_BUFFER_BIT | GL_DEPTH_BUFFER_BIT);
	glLoadIdentity();

	gluLookAt(
		0.0f, 0.0f, 3.0f,
		0.0f, 0.0f, 0.0f,
		0.0f, 1.0f, 0.0f);

	glRotatef(xrot, 1.0f, 0.0f, 0.0f);
	glRotatef(yrot, 0.0f, 1.0f, 0.0f);

	drawBox();

	glFlush();
}
The final part of this tutorial involves modifying the idle function. We could simply increase the two rotation values in this function to rotate the cube, but it would be great to have some additional functionality. Often, some technique will be discussed and you will want to keep the object stationary or move it around slowly. This will be achieved by allowing the user to rotate the object by holding down the left mouse button moving the mouse.
void idle()
{
First of all, we need to keep a boolean value specifying whether or not the mouse button is down. We make this a static variable so that it is simple to add or remove this code and the variable is not needed anywhere else. This variable allows us to keep track of if the user had pressed the left mouse button in a previous frame or if this is the first time that the button has been pressed.
static bool mouseDown = false;
Now if the mouse button has been pressed and this is the first time we are acknowledging the click, we need to change the mouseDown variable. We also need to store the current mouse position offset by the current rotation values. Note that the y values read by the mouse run from top to bottom whereas the y values in OpenGL run from bottom to top.
	if (opengl->isMouseDownL())
	{
		if (!mouseDown)
		{
			mouseDown = true;

			xdiff = opengl->getMouseX() - yrot;
			ydiff = opengl->getMouseY() + xrot;
		}
If the mouse button is down, no matter whether it is the first click or not, we need to update the rotation values. This is done by making use of the current mouse position and the values we stored when detecting the initial click. This allows the cube to rotate as the user drags the mouse.
		yrot = opengl->getMouseX() - xdiff;
		xrot = -opengl->getMouseY() + ydiff;
	}
If the mouse button is held down, we still want the cube to rotate by itself, so we set the mouseDown variable to false and increase the rotation values manually.
	else
	{
		mouseDown = false;

		xrot += 0.3f;
		yrot += 0.4f;
	}
}
Finally you have now been able to create a 3D object. This tutorial will form a base for many tutorials to come, especially the code allowing the user to rotate the object displayed on the screen.
Please let me know of any comments you may have : Contact Me
| Win32 Source Files : |  |
 |
||
| GLUT Source Files : |  |
 |
 |
Last Updated : 5 December 2005
| < Tutorial 12 - Perspective | Tutorial 14 - Backface Culling > |
All Rights Reserved, © Zeus Communication, Multimedia & Development 2004-2005
Read the Disclaimer
 |
|
|
|
What tutorial would you like to see next? |
|
Useful Books : 
|
Link to ZeusCMD

|