 |

|
Directional Lighting |
Tutorials > OpenGL ES > Directional Lighting
| View Full Source |
Introduction
 In the previous tutorial, we added light to a
scene. This light did not come from any particular direction.
This tutorial will deal with directional lighting. This allows us to take advantage of diffuse and specular lighting.
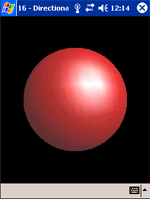
To show off the effect of specular lighting, a red ball will be placed with a bright light pointing down upon it.
Contents of main.cpp :
Once again, the first step is to create the arrays for our different light properties. We have added a specular array.
float lightAmbient[] = { 0.2f, 0.0f, 0.0f, 1.0f };
float lightDiffuse[] = { 0.5f, 0.0f, 0.0f, 1.0f };
float lightSpecular[] = { 1.0f, 1.0f, 1.0f, 1.0f };
A specular array for the material is also needed. We make the material reflect all light that hits it.
float matAmbient[] = { 1.0f, 1.0f, 1.0f, 1.0f };
float matDiffuse[] = { 1.0f, 1.0f, 1.0f, 1.0f };
float matSpecular[] = { 1.0f, 1.0f, 1.0f, 1.0f };
As this is a directional light, we need to know both the position of the light and the direction. The code below creates two arrays that will later set the light to be placed in the air and to the right of the ball. It will be pointing towards the origin and will thus need a direction vector of (-2,-2,-3).
float lightPosition[] = { 2.0f, 2.0f, 3.0f, 0.0f };
float lightDirection[] = { -2.0f, -2.0f, -3.0f };
Lighting is enabled along with the first light.
void init()
{
	glEnable(GL_LIGHTING);
	glEnable(GL_LIGHT0);
All properties for the material are set including the specular values.
	glMaterialfv(GL_FRONT_AND_BACK, GL_AMBIENT, matAmbient);
	glMaterialfv(GL_FRONT_AND_BACK, GL_DIFFUSE, matDiffuse);
	glMaterialfv(GL_FRONT_AND_BACK, GL_SPECULAR, matSpecular);
Another property set using the glMaterialf function is the GL_SHININESS property. This shininess value can be anywhere between 0 and 128. This specifies how focused the specular highlight will be. The higher the value, the more focused the specular highlight becomes.
glMaterialf(GL_FRONT_AND_BACK, GL_SHININESS, 20.0f);
The next step is to set our light properties.
	glLightfv(GL_LIGHT0, GL_AMBIENT, lightAmbient);
	glLightfv(GL_LIGHT0, GL_DIFFUSE, lightDiffuse);
	glLightfv(GL_LIGHT0, GL_SPECULAR, lightSpecular);
To set the position and direction of the light, you need to pass the GL_POSITION and GL_SPOT_DIRECTION flags to the glLightfv function.
	glLightfv(GL_LIGHT0, GL_POSITION, lightPosition);
	glLightfv(GL_LIGHT0, GL_SPOT_DIRECTION, lightDirection);
Another flag that can be used is the GL_SPOT_CUTOFF flag. This specifies the size of the lighting cone. Imagine how a torch creates a cone of light when you point it away from you. A value of 1.2 will create a cone with an angle of 2.4 degrees. A value of 180 degrees will radiate light in all directions.
glLightf(GL_LIGHT0, GL_SPOT_CUTOFF, 1.2f);
The next flag we will discuss is the GL_SPOT_EXPONENT flag. This is used to specify how focuses the light source will be. You can think of this in the same way as a torch focuses its light when you turn the top. Like the GL_SHININESS flag for materials, this value can range between 0 and 128.
glLightf(GL_LIGHT0, GL_SPOT_EXPONENT, 20.0f);
The rest of the display function remains the same. There are 3 other flags that can be used with the glLightf function. These are the attenuation flags.
The flags are GL_CONSTANT_ATTENUATION(1), GL_LINEAR_ATTENUATION(0) and GL_QUADRATIC_ATTENUATION with their default values shown within brackets. Attenuation is when the intensity of a light decreases as you move further away from the light source. Once again referring to a torch, the light from the torch gets dimmer the further the light travels. Setting these can cause your program to run substantially slower.
	glEnable(GL_DEPTH_TEST);
	glDepthFunc(GL_LEQUAL);

	glClearColor(0.0f, 0.0f, 0.0f, 0.0f);
	glClearDepthf(1.0f);

	glEnable(GL_CULL_FACE);
	glShadeModel(GL_SMOOTH);
}
The display method simply uses the glutSolidSphere / ugSolidSpheref function to create the sphere. This sphere has been created with 24 stacks and 24 slices. These are the horizontal and vertical components of the sphere. This allows greater lighting detail to be visible.
You may be wondering where we specify the normals. The nice thing about the UG / GLUT|ES library's shape functions is that a normal array is automatically used. All normals are therefore calculated within the UG / GLUT|ES library. This simplifies tasks greatly.
void display()
{
   glClear(GL_COLOR_BUFFER_BIT | GL_DEPTH_BUFFER_BIT);
   glLoadIdentity();

   gluLookAtf(
		0.0f, 0.0f, 4.0f,
		0.0f, 0.0f, 0.0f,
		0.0f, 1.0f, 0.0f);

   glRotatef(xrot, 1.0f, 0.0f, 0.0f);
   glRotatef(yrot, 0.0f, 1.0f, 0.0f);

   ugSolidSpheref(1.0f, 24, 24);

   glFlush();
   glutSwapBuffers();
}
Upon running the program, you will be presented with a red ball. Notice the specular highlight at the top right of the ball. You should now be able to add your own directional lights to your games.
Please let me know of any comments you may have : Contact Me
| GLUT|ES Source Files : |  |
|
| UG Source Files : |  |
Last Updated : 20 November 2005
| < Tutorial 15 - Lighting | Tutorial 17 - Texture Mapping > |
All Rights Reserved, © Zeus Communication, Multimedia & Development 2004-2005
Read the Disclaimer
 |
|
|
|
What tutorial would you like to see next? |
|
Useful Books : 
|
Link to ZeusCMD

|