 |

|
Solid Shapes |
Tutorials > OpenGL ES > Solid Shapes
| View Full Source |
Introduction
 Now that we have the ability to process depth and we can display primitives in a
perspective view, we are able to create 3D objects.
This tutorial follows on from the previous tutorial. A perspective view and depth parameters have already been setup.
Contents of main.cpp :
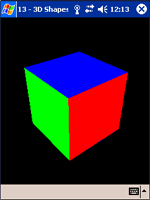
Below, we create an array of vertices to make up a cube. Notice that we do not have to create the cube using one continuous triangle strip. We can separate it between the sides. Enough vertices have been specified to create all sides using triangle strips.
We do not create one triangle strip as we want to make each side a different color.
GLfloat box[] = {
	// FRONT
	-0.5f, -0.5f,  0.5f,
	 0.5f, -0.5f,  0.5f,
	-0.5f,  0.5f,  0.5f,
	 0.5f,  0.5f,  0.5f,
	// BACK
	-0.5f, -0.5f, -0.5f,
	-0.5f,  0.5f, -0.5f,
	 0.5f, -0.5f, -0.5f,
	 0.5f,  0.5f, -0.5f,
	// LEFT
	-0.5f, -0.5f,  0.5f,
	-0.5f,  0.5f,  0.5f,
	-0.5f, -0.5f, -0.5f,
	-0.5f,  0.5f, -0.5f,
	// RIGHT
	 0.5f, -0.5f, -0.5f,
	 0.5f,  0.5f, -0.5f,
	 0.5f, -0.5f,  0.5f,
	 0.5f,  0.5f,  0.5f,
	// TOP
	-0.5f,  0.5f,  0.5f,
	 0.5f,  0.5f,  0.5f,
	 -0.5f,  0.5f, -0.5f,
	 0.5f,  0.5f, -0.5f,
	// BOTTOM
	-0.5f, -0.5f,  0.5f,
	-0.5f, -0.5f, -0.5f,
	 0.5f, -0.5f,  0.5f,
	 0.5f, -0.5f, -0.5f,
};
The next step is to setup our view and rotate the shape as per normal.
void display()
{
   glClear(GL_COLOR_BUFFER_BIT | GL_DEPTH_BUFFER_BIT);
   glLoadIdentity();

   gluLookAtf(
		0.0f, 0.0f, 3.0f,
		0.0f, 0.0f, 0.0f,
		0.0f, 1.0f, 0.0f);

   glRotatef(xrot, 1.0f, 0.0f, 0.0f);
   glRotatef(yrot, 0.0f, 1.0f, 0.0f);
We want opposite sides to all have the same color. It is therefore necessary to render 2 sides at a time.
You can now see how the start parameter can be used. The back of the box is created by starting at index 4 and processing 4 vertices.
   glColor4f(1.0f, 0.0f, 0.0f, 1.0f);
   glDrawArrays(GL_TRIANGLE_STRIP, 0, 4);
   glDrawArrays(GL_TRIANGLE_STRIP, 4, 4);
The top, bottom and sides are created in a similar fashion.
   glColor4f(0.0f, 1.0f, 0.0f, 1.0f);
   glDrawArrays(GL_TRIANGLE_STRIP, 8, 4);
   glDrawArrays(GL_TRIANGLE_STRIP, 12, 4);

   glColor4f(0.0f, 0.0f, 1.0f, 1.0f);
   glDrawArrays(GL_TRIANGLE_STRIP, 16, 4);
   glDrawArrays(GL_TRIANGLE_STRIP, 20, 4);

   glFlush();
   glutSwapBuffers();
}
Well done. As you can see, there is not much difference in creating 3D shapes. The only difference is that now we are using the z value. You can also see now how you can use small parts of vertex data at a time to create a small part of a larger object.
Please let me know of any comments you may have : Contact Me
| GLUT|ES Source Files : |  |
|
| UG Source Files : |  |
Last Updated : 20 November 2005
| < Tutorial 12 - Perspective | Tutorial 14 - Backface Culling > |
All Rights Reserved, © Zeus Communication, Multimedia & Development 2004-2005
Read the Disclaimer
 |
|
|
|
What tutorial would you like to see next? |
|
Useful Books : 
|
Link to ZeusCMD

|