
 |

|
Setting Up Your Environment |
Tutorials > OpenGL ES > Setting Up Your Environment
Requirements
Before you can begin programming OpenGL ES for the PocketPC, you will need the following :
- Embedded Visual C++ 4.0
- Embedded Visual C++ 4.0 Service Pack 4
- Pocket PC 2003 SDK
- An OpenGL ES Implementation
OpenGL ES Implementations
Vincent Mobile 3D Rendering Library
The Vincent Mobile 3D Rendering Library an OpenGL ES implementation that can be used for both commercial and non-commercial projects without having to pay license fees. Another great feature is that the library arrives standard with window management functions, allowing applications to be setup quickly and easily.
Hybrid's "Rasteroid" Implementation
The Hybrid implementation is a commercial library which can be used freely for non-commercial use. License fees need to be payed if you wish to develop a commercial application using this library. The Hybrid implementation does offer advantages over the Vincent library. Some advantages I have come across include a higher frame rate for tested devices as well as the ability to use a depth buffer with greater precision.
Other OpenGL ES Implementations
As new implementations become available, they will be added here once tested.
GLUT|ES
The GLUT|ES library will be used in conjunction with these implementations as it greatly simplifies the creation and usage of an OpenGL ES window.
Installation
You will need to install the first 3 items above. They are normal windows installations. Note that the cd-key for Embedded Visual C++ 4.0 is given at the bottom of the download page given above.
Vincent Library Installation
Download the latest binary version of Vincent from the link above. After extracting the Vincent library, you will be copying files to your C:\Program Files\Windows CE Tools\wce420\POCKET PC 2003\ directory where C:\Program Files\Windows CE Tools\ is your pocket pc sdk install directory. We will refer to this directory from now on as your /sdk/ directory. In the Lib and Include sub-directories, you will notice that there is an Armv4 and an Emulator directory. These are the different directories that are used depending on what you are compiling for.
Copy the contents of the /dist/include directory to your sdk/Include/Armv4 and sdk/Include/Emulator directories.
Then copy the contents of the /dist/bin/emu/Debug directory except for the libGLES_CM.dll file to your /sdk/Lib/Emulator directory.
Copy the contents of the /dist/bin/arm/Release directory except for the libGLES_CM.dll file to your /sdk/lib/Armv4 directory.
To simplify window creation, you can make use of the UG library that comes standard with the Vincent library. This is acceptable but it does have its problems. I would recommend using GLUT|ES library as it provides more features and seems to be more stable. You will be able to follow the tutorials whether you use the GLUT|ES library or whether you use the UG library (GLUT|ES Installation).
Installation of Hybrid "Rasteroid" Implementation and other OpenGL ES Implementations
Download the latest binary version of the library you are using from the link above or from another link you may have. After extracting the library, you will be copying files to your C:\Program Files\Windows CE Tools\wce420\POCKET PC 2003\ directory where C:\Program Files\Windows CE Tools\ is your pocket pc sdk install directory. We will refer to this directory from now on as your /sdk/ directory. In the Lib and Include sub-directories, you will notice that there is an Armv4 and an Emulator directory. These are the different directories that are used depending on what you are compiling for.
The library you have downloaded should contain an include directory. Copy the contents of this directory to your sdk/Include/Armv4 and sdk/Include/Emulator directories.
The library you have downloaded should also contain a Release or a bin directory. Copy the contents of this directory (libGLES_CM.lib) except for the libGLES_CM.dll file to your /sdk/Lib/Emulator or /sdk/lib/Armv4 directory depending on which version of the library you have downloaded.
Installation of GLUT|ES
To simplify the creation of an OpenGL ES window, we will be making use of the GLUT|ES library. This library can be downloaded from the link above. Also download the GLU|ES library from the same link.
Extract the GLUT|ES library and copy the contents of the Inc directory into your sdk/Include/Armv4 directory.
Copy the contents of the ARMV4Rel directory except for the glutes.dll into your /sdk/lib/Armv4 directory. If you are compiling for the x86 processor, you must make use of the libraries in the x86Rel directory.
Extract the GLU|ES library and copy all files into your sdk/Include/Armv4 directory.
The best option would be to download the GLUT|ES source code from the website given above and to compile it using your current OpenGL ES libraries. This can sometimes prove to be quite difficult so I have provided the GLUT|ES and GLU|ES header files and compiled (ARM) library files (Vincent 0.83 or Hybrid 1.1).
A few people have had problems compiling with GLUT|ES and receive errors about the winmm.lib library. One of our forum members, blotfib, has kindly re-compiled GLUT|ES to fix this problem. Please download and use the re-compiled package if you are receiving these errors.
Creating a New Project and Setting up the Emulator / PDA
- Open Embedded Visual C++ 4.0
- Click on File > New
- Select WCP Pocket PC 2003 Application
- Input TestProject under Project name
- Click OK
- On the next dialog, select A typical "Hello World!" Application and click Finish
- Click OK on the next dialog.
A project will open with an already made application. Above the code window, select POCKET PC 2003 Emulator from the rightmost dropdown box.

Press F7 or click on Build > Build TestProject.exe.
The emulator will appear. Click Emulator > Folder Sharing and specify a directory on your hard drive. The contents of this directory will be available in the storage card location on the emulator.
The last thing you need to do is to copy the libGLES_CM.dll file to your /Windows directory on your emulator. The location of this file for the Vincent library is /dist/bin/emu/Debug/libGLES_CM.dll.
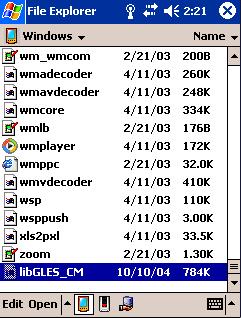
This can be achieved by clicking on the Emulator > Folder Sharing menu option. You will then need to select a directory that will be shared between your emulator and your normal windows file system. Place the dll file in the directory that you have specified and then you will be able to retrieve it by accessing the storage card of the emulator. The storage card can be accessed by clicking on the storage card button in the file explorer as shown circled in red below.

Dll files are generally hidden by default. You therefore may have to hold down your stylus on an empty space and click on the View All Files menu option as shown circled in blue above. Place the dll file in your share directory and copy it across to your /Windows directory.
You can now create a new project using the steps above except that you will need to create an empty project to start a new OpenGL ES program.
One last thing to remember is that you must select what version you want to compile for. Select Win32 (WCE emulator) Debug when you want to test your program on the emulator and select Win32 (WCE ARMV4) Release when you want to deploy the program to your Pocket PC device. Also remember to copy the /dist/bin/arm/Release/libGLES_CM.dll file to your Pocket PC device.

You should now be able to start creating OpenGL ES projects.
Please let me know of any comments you may have : Contact Me
Last Updated : 28 July 2006
| < Tutorial 01 - What Is OpenGL ES? | Tutorial 03 - OpenGL Window > |
All Rights Reserved, © Zeus Communication, Multimedia & Development 2004-2005
Read the Disclaimer
 |
|
|
|
What tutorial would you like to see next? |
|
Useful Books : 
|
Link to ZeusCMD

|