
 |

|
Setting Up Your Environment |
Tutorials > C++ > Setting Up Your Environment
Introduction
This tutorial will show you how to setup your environment to program in C / C++.
- If you would like to program using Windows and Microsoft Visual Studio.NET, please look at the Visual Studio.NET section.
- If you would like to program using Windows and a free compiler and development environment (Dev-C++), please look at the Dev-C++ section.
- If you would like to program using Unix or Linux, please look at the Unix / Linux section.
Microsoft Visual Studio.NET
Visual Studio.NET (VS.NET) should already be installed. Open up VS.NET and click on File > New Project.
Select Visual C++ Projects under Project Types and select Win32 Projects under Templates
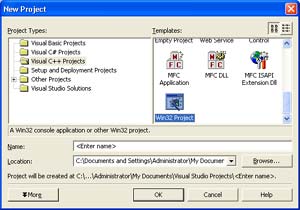
Enter a project name such as Test and click OK
The wizard will appear. Click on Application Settings, select Console Application and tick Empty Project.
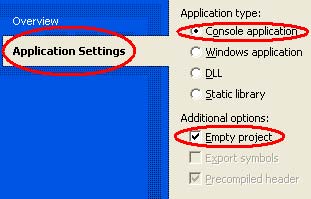
Click Finish. If you do not see your Test project in a Solution Explorer window, click on View > Solution Explorer
Right-click on Source Files in the Solution Explorer and select Add > New Item
Highlight a C++ File(cpp) and type in main.cpp for the filename. Click OK
You will be presented with a blank page. If you press F5 now to compile your file and click Yes to build it and No to continue when build errors occur,
you will be presented with an error similar to the following "Test error LNK2019: unresolved external symbol _main referenced in function _mainCRTStartup".
Do not worry about this as this is because you do not have any code written. You have now learnt how to successfully set up a VS.NET project to start programming.
Dev-C++
Dev-C++ should already be installed. I am using the Dev-C++ Version 5 beta. This can be downloaded from www.bloodshed.net
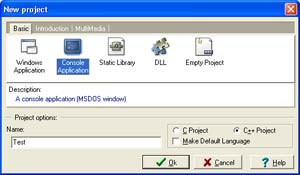
Click on File > New > Project
Highlight Console Application and enter Test as a project name.
Click OK and then select where you would like your project to be stored.
You will be presented with a file containing a number of lines of code. This code will be explained in a future tutorial. For now, click on Execute > Compile and then click Save to save your main.cpp file.
You may get an error that iostream cannot be found. I have found this to be a problem with Dev-C++ on first install. To fix this you will have to setup some compiler options. This should only need to be done once and then each project you create afterwards, should work perfectly.
Click on Tools > Compiler Options.
Click on the Directories tab.
Each of the sub-tabs should have the following settings where c:\Dev-C++ is my install directory (yours may be different) :
| Binaries : | C:\Dev-Cpp\bin |
| Libraries : | C:\Dev-Cpp\lib |
| C Includes : | C:\Dev-Cpp\include |
| C++ Includes : |
C:\Dev-Cpp\include C:\Dev-Cpp\include\c++ C:\Dev-Cpp\include\c++\backward C:\Dev-Cpp\include\c++\bits C:\Dev-Cpp\include\c++\ext C:\Dev-Cpp\include\c++\mingw32 |
You should now be able to compile your program perfectly and when you click on Execute > Run, you should get a command prompt that says "Press any key to continue . . .".
You have successfully set up Dev-C++ to program in C++ and you now know how to start a new project.
Unix / Linux
For those of you taking the Unix route, congratulations on embarking on the journey that many people are afraid of. Do not worry though, as most of the programming works exactly the same way and you are able to accomplish so much more utilizing the power of Unix / Linux.
Open up any terminal and type g++
If you get the message "g++ : No Input Files" then you know that you
have g++ installed. If not, please make sure you have g++ installed.
Type touch main.cpp which will create a 0 byte file. You can also do this using any visual editor or a console editor such as vi.
Create another file in the same directory called Makefile. This is used to automate the compile process. You will see how this is achived further down.
Type the following for the contents of Makefile :
main : main.cpp
	g++ main.cpp -o main

clean :
	rm -rf main
Now when you type make, you will compile your source file. The resulting executable
is specified by the -o. In this case it is main.
You will get an error saying that it is in function _start and there is an undefined reference to main. This is fine as we have
not written any source code yet. At least you know that the compiler is working. We will discuss how to make a working program
in a future tutorial.
The main.cpp shown after the main : section shows file
dependencies. This will result in your file only being compiled if your main.cpp file has been
modified since last compile. If your file has not been changed, it will say that your executable is up to date.
The clean section shows what will happen if you type make clean
In this case, it will delete your executable.
Congratulations! You now know how to create a makefile in Unix / Linux and you know how to go about compiling your source files.
Please let me know of any comments you may have : Contact Me
| < Tutorial 01 - What is C++? | Tutorial 03 - Main Function > |
All Rights Reserved, © Zeus Communication, Multimedia & Development 2004-2005
Read the Disclaimer
 |
|
|
|
What tutorial would you like to see next? |
|
Useful Books : 
|
Link to ZeusCMD

|